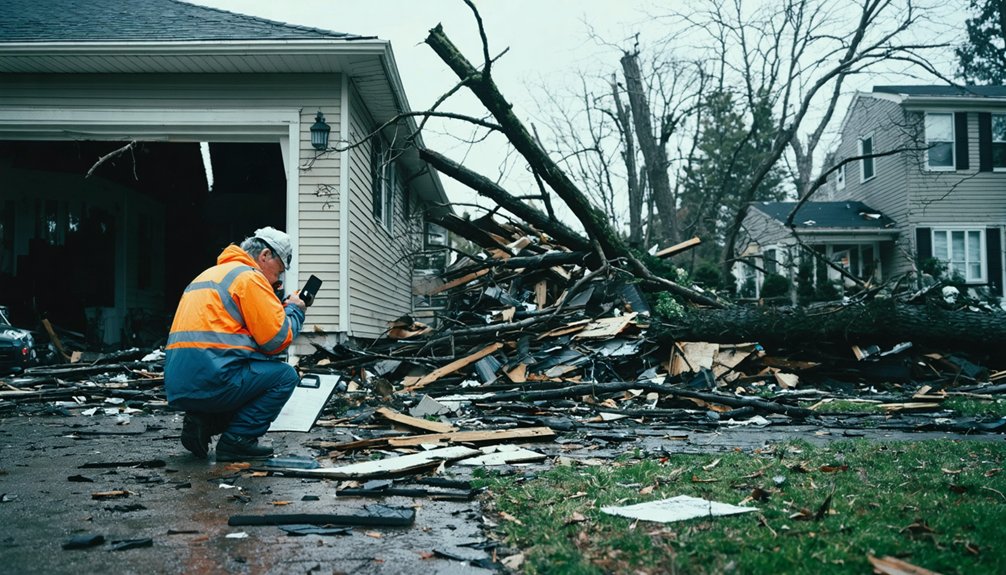
Document storm damage by first ensuring safety, then photographing each area from multiple angles with measuring tools for scale. Record video walkthroughs with narration while opening closets and cabinets to show hidden damage. Create detailed inventories room-by-room, including make, model, and serial numbers. Timestamp all evidence within 24-48 hours and save meteorological reports that verify the storm’s occurrence. Back up documentation in multiple locations and maintain organized records with receipts and contractor assessments to strengthen your claim and maximize settlement outcomes.
Key Takeaways
- Photograph damage from multiple angles with scale references like measuring tape or common objects for accurate assessment.
- Record video walkthroughs of all affected areas with clear narration documenting timeline and mitigation efforts.
- Document storm details within 24-48 hours, including official weather reports with date, time, and intensity measurements.
- Create room-by-room inventory with item descriptions, model numbers, locations, and estimated replacement costs with receipts.
- Prioritize safety by checking for structural risks, gas leaks, and downed power lines before entering damaged areas.
Prioritize Safety Before Beginning Any Documentation Process
Before you document storm damage for insurance purposes, you must confirm that entering your property won’t put you or others at risk. Wait for local authorities to authorize building re-entry and grant safety clearance.
Inspect visually for falling debris or collapse risks before approaching. Assume all downed power lines are energized and maintain distance from anything they contact. If you detect natural gas smells or hissing sounds, evacuate immediately and contact the gas company from a neighboring location. Use battery-powered flashlights instead of open flames that could ignite gas.
When conducting thorough inspections, ensuring proper safety gear includes waterproof gloves and rubber boots in flood-affected areas. Never operate generators, grills, or camp stoves indoors. Contact utility companies and reputable contractors before proceeding with documentation activities.
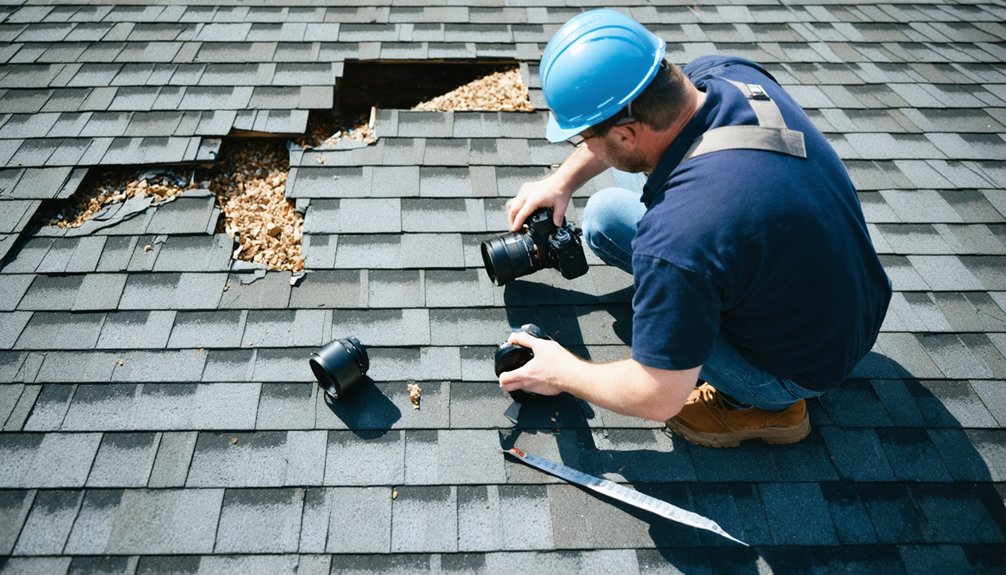
Capture Comprehensive Photographic Evidence of All Damage
You’ll need to photograph each damaged area from at least three different angles to create a complete visual record that captures depth, context, and full extent of destruction.
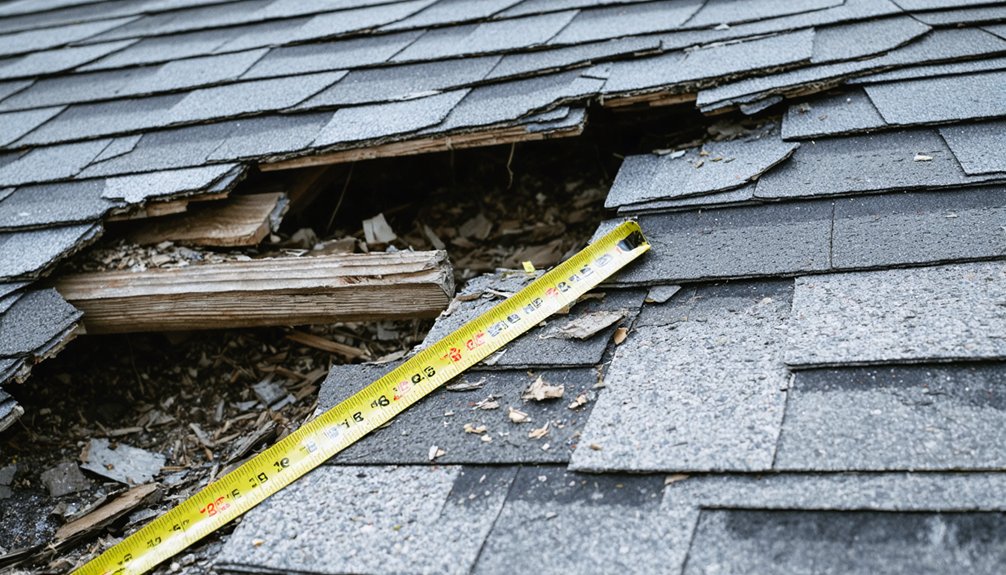
Place a measuring tape, ruler, or common object like a coin next to cracks, water stains, and structural damage to provide accurate scale references in every shot.
These multiple perspectives with clear measurements eliminate ambiguity and provide insurance adjusters with verifiable documentation they require for claims processing.
Multiple Angles Per Location
How can a single photograph truly capture the full scope of storm damage when structural issues and debris patterns reveal themselves differently from each vantage point? You’ll need varying perspectives from opposing corners to document damage patterns accurately. Position yourself at eye-level from contrasting viewpoints to reveal structural compromises that remain hidden from a single angle.
Essential multi-angle documentation includes:
- Wide-angle shots from opposing corners establishing thorough damage distribution
- Doorway positioning that displays entire room layouts without obstruction
- Panoramic shots capturing extensive storm scenes when single-frame documentation proves insufficient
You’ll discover critical damage evidence by photographing from multiple angles—ceiling cracks visible from one corner, water intrusion patterns apparent from another. This systematic approach guarantees adjusters receive complete documentation, preventing disputed claims and protecting your restoration rights.
Scale References in Shots
A measuring tape positioned beside damaged areas transforms vague documentation into precise evidence that insurance adjusters can’t dispute. Specific scale reference positioning guarantees you’re capturing actual dimensions of cracks, water stains, and structural compromises. Place the tape visibly alongside damage without obscuring critical details—this gives adjusters concrete measurements they need for accurate claim processing.
Comparison with undamaged elements establishes credibility in your documentation. Include intact features near damaged areas to demonstrate the storm’s impact clearly. Exterior shots benefit from landmarks and street signs that verify your property’s location, while interior photos gain context from room-specific details.
Combine scale references with proper lighting to reveal moisture levels and hidden damage. Document each restoration phase consistently, maintaining scale elements throughout your photographic timeline for thorough tracking.
Record Detailed Video Walkthroughs With Narration
When storm damage strikes your property, creating a detailed video walkthrough with clear narration establishes the most detailed evidence for your insurance claim. Begin recording from the street in horizontal orientation, methodically progressing through each room while verbally describing what you observe. This approach provides timeline verification and contextual documentation that photographs can’t match.
Video documentation with clear narration creates the most comprehensive evidence record for insurance claims following storm damage to your property.
Essential recording practices include:
- Capture multiple angles of each damaged area, including roof, siding, windows, floors, and personal belongings before any cleanup begins
- Open closets and cabinets during filming to demonstrate interior damage extent and water intrusion patterns
- Utilize natural lighting and backup data storage systems to preserve authentic evidence against potential disputes
Document storm debris, temporary tarps, and mitigation efforts to demonstrate your proactive damage containment measures.
Maintain Thorough Written Records and Damage Inventories
You must record the exact date and time the storm occurred, as this information anchors your entire insurance claim and establishes the timeline for all subsequent damage.
Create a detailed written inventory that catalogs each damaged item with specific descriptions, locations, measurements, and estimated repair costs to provide verifiable evidence of your losses.
Collect and document witness statements from neighbors, contractors, or other observers who can corroborate the storm’s severity and the damage it caused to your property.
Document Storm Date Details
Establishing precise temporal documentation strengthens your insurance claim by creating an irrefutable timeline linking property damage to a specific weather event. You’ll need to track weather conditions immediately, ensuring your camera or smartphone displays correct timestamps on all photos and videos. Save official meteorological reports that corroborate the storm’s occurrence and intensity.
Document damage within 24-48 hours to prevent further deterioration while maintaining evidence integrity. Your timeline should include:
- Storm date, time, and duration with heavy rain, hail size, and wind speed measurements
- Photo timestamps linking damage directly to the weather event
- Immediate protective actions taken with dates and contractor contact information
Obtain professional reports from licensed contractors to provide additional credibility. This evidence-focused approach establishes legitimacy and prevents claim disputes over causation.
Create Comprehensive Damage Inventory
After documenting when the storm occurred, your next step requires cataloging every damaged item with systematic precision. Create exhaustive damage logs using spreadsheet templates that include item descriptions, quantities, purchase dates, original costs, and estimated replacement values.
Record make, model, and serial numbers from photos or labels for each possession. Your detailed item valuation should reference specific photo file names, enabling adjusters to cross-check documentation efficiently. Include measurements for furniture dimensions and attach receipts, appraisals, or warranty documents to substantiate values.
Organize entries room-by-room with clear labels, capturing everything from appliances and electronics to clothing and décor. Document replacement cost URLs from online sources and maintain separate tracking for additional living expenses, ensuring you’ve established an unassailable evidence baseline.
Compile Witness Statement Records
Witness statements serve as independent verification of storm damage circumstances, transforming firsthand observations into legally defensible documentation that strengthens your insurance claim. You’ll need each witness to record their full contact information, precise incident date and time, and exact location details. Their narratives should confirm chronological sequence of events, describing what they observed through all senses during the storm.
Structure each statement with these critical components:
- Factual observations – Weather conditions, debris impact, structural damage progression without speculation or assumptions
- Supporting evidence – Photographs, videos, repair estimates, and references to other witnesses present
- Preventive context – Emergency response actions, authority notifications, and contributing factors like high winds
Obtain detailed weather data to corroborate witness accounts, ensuring your documentation remains objective and evidence-focused throughout the claims process.
Use Measuring Tools to Demonstrate Scale and Severity
Quantifying storm damage transforms subjective observations into defensible data that insurance adjusters, emergency managers, and recovery planners can act upon with confidence. You’ll demonstrate scale of destruction by employing measurement tools that capture precise dimensions of affected areas, structural failures, and vegetation damage. Electronic recording systems eliminate manual calculation errors during rapid assessments while maintaining accuracy.
Annotation features let you mark specific damage indicators across 28 standardized categories, ensuring consistency when you quantify damage severity. For vegetation assessment, use Biltmore sticks or diameter tape to measure trees exceeding 6 inches in diameter. Spatial measurements on satellite imagery enable calculation of flooded areas and infrastructure impacts with quantifiable metrics. These precision documentation capabilities support insurance claims, grant applications, and remediation planning with objective evidence.
Document Multiple Angles and Perspectives of Each Damaged Area
You must photograph every side of your property—north, south, east, and west elevations—to create a complete damage inventory that safeguards against disputes over missing documentation. Insurance adjusters require both interior and exterior angles of the same damage to verify storm penetration paths and establish cause-and-effect relationships between roof breaches and water-damaged ceilings.
Capturing all building elevations guarantees no hail dents, siding damage, or broken windows escape documentation, while paired interior-exterior shots prove the damage originated from external weather events rather than pre-existing conditions.
Capture All Building Elevations
When documenting storm damage, establishing a systematic photographic pattern around all building elevations guarantees no structural issues go unrecorded. You’ll need wide-angle shots capturing overall affected areas, combined with close-up images detailing severity on each side. Sequential site visits immediately post-storm document pre-repair conditions, while drone reconnaissance provides critical overhead perspectives distinguishing wind versus surge damage.
Your elevation inspection protocol should include:
- Plumbness measurements at each elevation to assess structural racking and deviations
- Multiple perspective documentation from front, rear, left, right, and corner views with timestamped imagery
- Ground-level analysis recording undermined slabs, displaced framing, water penetration, and foundation compromises per side
Compare in-field measurements against FEMA certificates to determine surge impact at specific heights above grade across all elevations.
Photograph Interior and Exterior
Detailed photographic documentation requires capturing each damaged area from multiple vantage points to establish irrefutable evidence for insurance claims and restoration planning. You’ll need to photograph from opposing room corners at eye level, providing thorough spatial context.
Your damage assessment methodology should include wide-angle shots establishing overall conditions, followed by close-ups documenting specific issues like cracks, water stains, and structural compromises. Include measuring tape in frames for accurate scale reference.
Adequate lighting consideration proves critical—you’ll want to use portable lights or flashlights in dark spaces to reveal damage’s true extent without shadows obscuring evidence. Capture serial numbers, model numbers, and brand names on affected items. Document hidden areas inside closets and cabinets. Shoot both macro and micro perspectives of each damaged section, ensuring you’ve created an indisputable visual record.
Organize and Backup All Documentation in Multiple Locations
Proper organization of storm damage documentation protects your financial interests and accelerates the claims process. You’ll need a systematic approach that secures access regardless of circumstances. Create a primary digital folder titled “Insurance Claim [Date]” with subfolders for receipts, estimates, and room-by-room inventories. Upload everything to cloud services like Google Drive for immediate accessibility.
Implement redundancy through multiple storage methods:
- Use an on site backup device such as an external drive stored with your insurance policy documents
- Establish off site backups planning by maintaining copies in fire- and waterproof boxes at separate locations
- Email copies to personal accounts for timestamped proof and platform-independent access
This multi-location strategy guarantees you’ll retain critical documentation even if primary storage fails, maintaining control throughout your claim resolution.
Include Timestamps and Location Labels on All Evidence
Timestamps and location labels transform your storm damage documentation from simple photographs into legally defensible evidence that insurance adjusters can’t easily dispute. Enable your device’s timestamp feature before documenting—verify sensor synchronization guarantees accurate date and time display across all equipment. Establish a consistent timestamping workflow: capture the storm date, document damage immediately afterward, and timestamp each mitigation step.
Label every photo and video with specific locations: “northwest roof section,” “kitchen ceiling interior,” or “detached garage foundation.” Add verbal narration in videos, stating both location and time observations. This methodical approach creates an irrefutable chronological record that prevents claim disputes and delays. Your precisely labeled, timestamped evidence maintains credibility, eliminates ambiguity, and gives you control over the claims process rather than leaving interpretation to others.
Collect and Preserve Witness Statements When Available
While photographs and videos capture physical evidence, eyewitness accounts add independent verification that strengthens your claim’s foundation. You’ll need to act quickly—collect statements immediately after the storm while details remain fresh and accurate. Verify witness credibility by documenting their proximity to the event and specific observations they can confirm.
Eyewitness accounts provide independent verification for storm damage claims—collect detailed statements immediately while observations remain fresh and credible.
Essential steps for preserving witness statements:
- Record audio/video statements with explicit permission, then transcribe them for your documentation file
- Obtain written narratives that include the witness’s full name, contact information, and relationship to the incident
- Have witnesses sign and date their statements, preferably with notarization to establish legal authenticity
Focus on factual observations—storm timing, weather conditions, and visible damage sequences. Notarized statements carry significant weight with insurers and prevent future disputes about what occurred.
Report and Communicate Promptly With Insurance Providers

Once you’ve documented the damage, contact your insurer promptly, provide thorough damage details—ideally within 24 to 48 hours after the storm passes. Most policies require reporting within 48-72 hours to avoid disputes or denial for late notice. Use your insurer’s 24/7 hotline or online portal with your policy number ready.
During first contact, describe the storm date, weather conditions, and specific damage types—roof, siding, windows, interior. Indicate whether your home remains habitable and what emergency mitigation steps you’ve taken. Note your claim number, adjuster name, and all correspondence details immediately.
Maintain detailed records of every interaction: dates, times, names, and conversation summaries. Match these logs against your insurer’s records if disputes arise. Prepare your photos, videos, and written inventory for prompt submission—comprehensive documentation supports faster claim resolution.
Frequently Asked Questions
What File Formats Do Insurance Companies Prefer for Submitted Documentation?
Insurance companies prefer standard digital file formats like JPEG or PDF for photographic evidence and documents. You’ll find these universally accepted formats guarantee compatibility, prevent processing delays, and let you maintain control over your claim’s efficient submission and review.
Should I Hire a Public Adjuster Before Documenting Damage Myself?
Yes, you should hire a public adjuster first. They’ll uncover hidden damages you’d miss. However, consider hiring a roofer for initial assessments and consult local authorities about documentation requirements before beginning your claim process independently.
How Long Do I Have to File a Claim After Storm Damage?
You’ve got one year from the loss date in Florida for timely claim submission. Document immediately with extensive photographic evidence—waiting weakens your position. Early filing protects your rights and prevents insurers from disputing causation or denying coverage due to delays.
Can I Begin Emergency Repairs Before the Insurance Adjuster Inspects Damage?
Like Noah taking action before the flood subsided, you can start repairs immediately to prevent further damage. However, you should coordinate with your adjuster beforehand and document everything with photos and receipts for reimbursement.
What Happens if My Documentation Contradicts the Insurance Adjuster’s Assessment?
When your documentation contradicts the adjuster’s assessment, you’ll trigger a formal review process. Present your conflicting estimates and evidence systematically. Insurance companies must re-evaluate adjuster disagreements, potentially ordering re-inspections or independent appraisals to resolve discrepancies fairly.