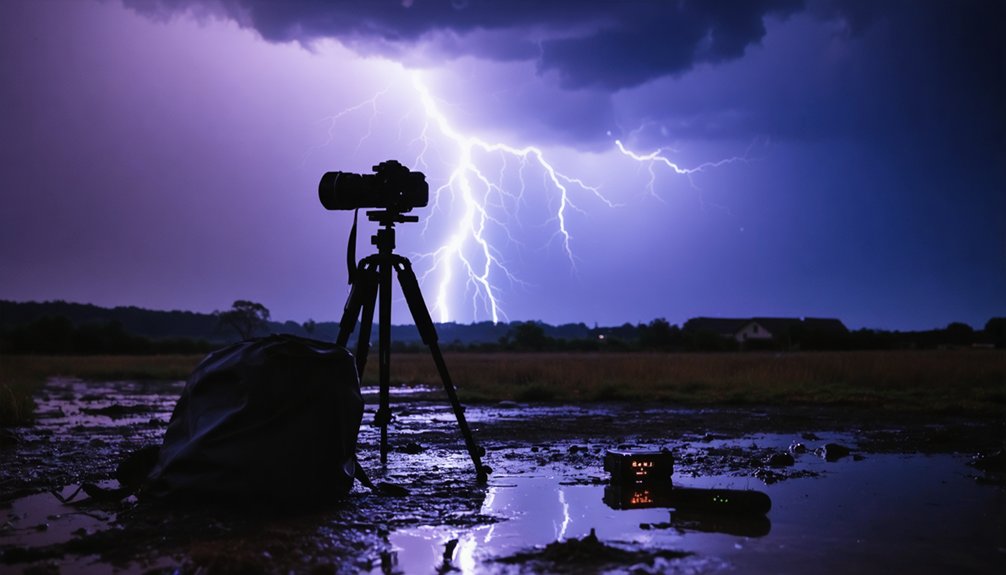
To capture lightning, you’ll need a DSLR or mirrorless camera, a wide-angle lens, and a sturdy tripod. Shoot in RAW format and start with ISO 100–200 to minimize noise. Set your aperture between f/4–f/8 for distant storms, use 15–30 second exposures, and switch to manual focus at infinity. Always scout your location beforehand and retreat if lightning is under three miles away. Every one of these variables connects to the next in ways that’ll sharpen your results considerably.
Key Takeaways
- Use a sturdy tripod, wide-angle lens (14–28mm), and RAW format to maximize stability, coverage, and post-processing flexibility.
- Set aperture between f/4–f/8 for distant storms and f/13 for closer strikes, keeping ISO at 100–200.
- Use 15–30 second exposures or Bulb mode to capture multiple unpredictable lightning strikes in a single frame.
- Switch to manual focus, set to infinity, and use Live View to lock focus on distant light sources.
- Scout open locations during daylight, monitor lightning-thunder intervals, and retreat if strikes are under three miles away.
What Gear Do You Actually Need for Lightning Photography?
Gear makes or breaks your lightning photography sessions, but you don’t need to empty your wallet to get started.
Camera types range from entry-level DSLRs to APS-C mirrorless systems—both handle exposure settings effectively without requiring premium investment.
You don’t need a high-end camera to shoot lightning—entry-level DSLRs and APS-C mirrorless systems both deliver.
For lens options, prioritize wide-angle focal lengths between 14mm and 28mm. These capture broader sky coverage, maximizing your chances of framing active strikes.
Avoid shooting at maximum aperture; stopping down slightly sharpens your results considerably.
You’ll also need a sturdy tripod and a wireless shutter release or intervalometer to eliminate camera shake during long exposures.
Don’t overlook safety gear—rubber-soled footwear and awareness of your surroundings keep you protected while you’re focused on the storm.
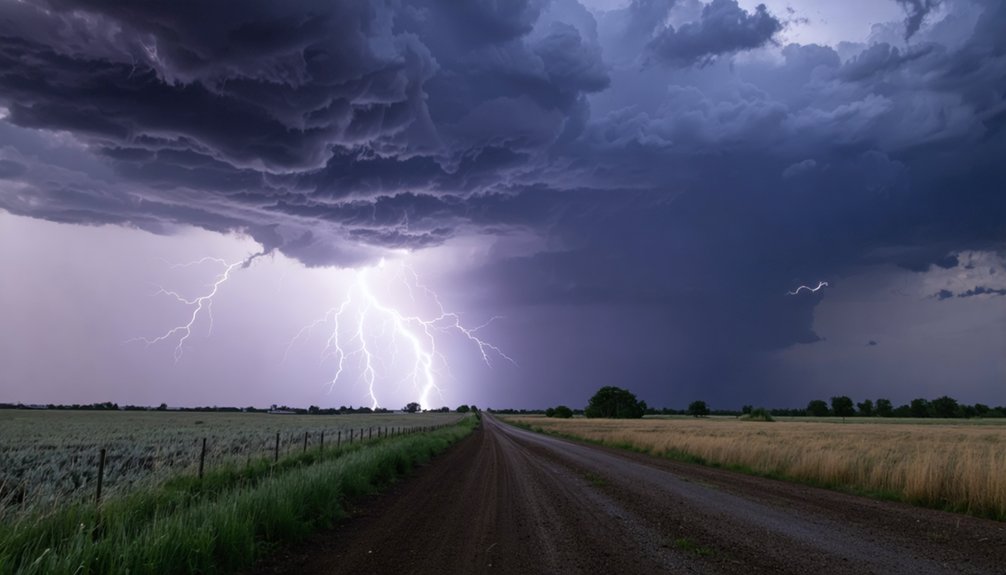
Choose the Right Location for Lightning Photography Before the Storm Hits
Before the storm arrives, scout your location during daylight hours to identify clear sightlines toward the horizon where lightning activity is most likely to develop.
Prioritize open terrain—fields, hilltops, lakeshores, or elevated parking structures—that maximizes your field of view and reduces obstructions blocking potential strike zones.
Always map at least one safe escape route in advance so you can retreat quickly if the storm shifts direction or closes distance faster than anticipated.
Scout Locations Early
Choosing the right location determines whether you’ll capture a striking composition or waste hours pointing your camera at an empty sky. Use storm tracking apps and weather forecasting tools to identify where active cells are developing before you grab your gear.
Arrive at least 30 minutes early to evaluate foreground elements, establish safe escape routes, and assess ambient light conditions.
Prioritize open elevated areas with unobstructed sightlines—flat plains, lakeshores, or ridge lines work exceptionally well. Avoid locations beneath isolated trees or near metal structures.
Identify multiple shooting angles so you can reposition quickly as storm direction shifts. Pre-visualizing your composition while conditions remain calm lets you focus entirely on exposure adjustments once lightning activity begins, maximizing your productive shooting window.
Prioritize Open Sightlines
Once you’ve locked in your location through storm tracking and early arrival, the specific spot within that location determines your compositional ceiling.
Prioritize unobstructed horizons—open landscapes like fields, plains, or lakeshores give you unrestricted sky coverage and maximum strike capture probability. Your wide-angle lens needs room to work, and cluttered foregrounds steal that advantage.
In urban settings, position yourself where buildings frame rather than block the storm’s approach vector. Rooftops, parking structures, and elevated parks often provide clearance that street level doesn’t.
Avoid low-lying areas with dense tree lines or structures that interrupt your sightline below 30 degrees of elevation. Lightning frequently strikes lower than expected.
Every degree of blocked horizon reduces your odds of capturing a clean, unobstructed bolt.
Plan Safe Escape Routes
Every shooting location you select needs a pre-planned exit strategy, because storms escalate faster than your gear can be packed.
Before setting up your tripod, identify at least two exit routes leading to hard-sided shelter—not trees or open shelters.
Use storm tracking tools and weather apps like RadarScope to monitor cell movement in real time.
Set proximity alerts so you’re not dependent on visual cues alone.
When lightning safety guidelines recommend the 30-30 rule—30 seconds between flash and thunder means immediate retreat—you should already be moving, not deciding.
Pack your safety gear list with a lightning detector for an additional early-warning layer.
Your freedom to shoot depends entirely on your ability to leave decisively.
Hesitation costs more than a missed frame ever will.
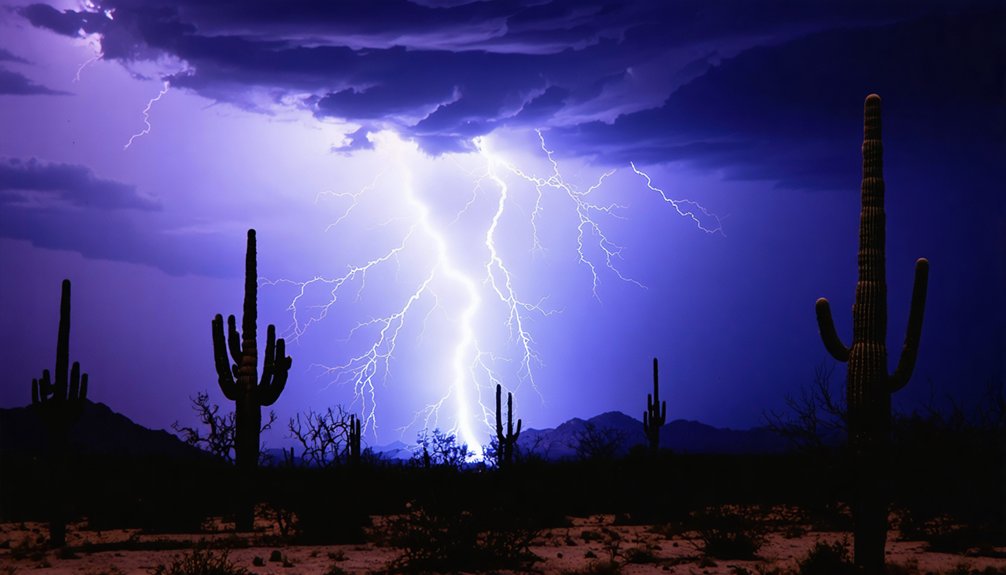
Set Your Aperture First: It Controls Everything
When shooting lightning, aperture is your most critical exposure variable because lightning behaves like a massive, uncontrolled speedlight—you can’t predict its intensity, but you can manage how much of it reaches your sensor.
Mastering aperture control gives you the exposure balance you need across varying storm distances.
Use narrow apertures around f/13 for close strikes to prevent blown-out bolts. Shift toward f/4–f/8 when the storm sits farther away, allowing enough light to render distant bolts clearly.
Avoid shooting wide open—most lenses lose sharpness at maximum aperture, so stop down slightly.
As the storm moves, adjust aperture gradually rather than making dramatic jumps. You’re effectively dialing a dimmer switch, responding to what the storm delivers in real time.
Which Shutter Speed Works Best for Lightning Shots?
Aperture handles brightness, but shutter speed determines how many bolts you capture in a single frame. For active storms, 15–30 second exposures work best, letting you stack multiple strikes into one compelling image. Count the time between strikes to calibrate your lightning timing—if bolts fire every 10 seconds, a 30-second exposure theoretically captures three strikes, maximizing your ideal exposure opportunities.
Shutter speed controls how many bolts you capture—longer exposures mean more strikes stacked into one dramatic frame.
Bulb mode gives you complete control when storm activity is unpredictable, keeping the shutter open exactly as long as needed.
Daytime lightning demands faster speeds between 1/4 and 1/20 second to counteract ambient brightness. At night without artificial light, extend exposures to 20–30 seconds.
Consistent shutter speeds across sequential shots also simplify compositing or panorama stitching later, so lock in your settings once conditions stabilize.
Use Bulb Mode to Catch Unpredictable Strikes
Bulb mode keeps your shutter open for as long as you hold the release button, making it the most flexible option when lightning strikes at irregular intervals. Among bulb mode benefits, the most significant is complete control over exposure duration—you’re not locked into a fixed interval when strike timing becomes erratic or unpredictable.
Pair bulb mode with a wireless shutter release or intervalometer to eliminate camera shake from physical contact. Hold the shutter open, watch for the bolt, then release immediately after the strike concludes. This technique lets you respond to the storm rather than work around a preset timer.
Bulb mode does demand more active attention than standard long exposures, but that tradeoff gives you maximum adaptability when a storm behaves unpredictably.
Keep Your ISO Low and Out of the Way
ISO functions as the simplest variable in your lightning exposure equation—set it low and leave it alone. Unlike aperture and shutter speed, ISO demands minimal adjustment once established.
Effective ISO strategies prioritize noise reduction from the start, letting aperture and shutter speed handle the heavy lifting.
Follow this straightforward framework:
- Start at ISO 100-200 for most shooting conditions to minimize long-exposure noise.
- Increase ISO only in extremely dark conditions—post-sunset storms with heavy cloud cover justify bumping it slightly higher.
- Adjust ISO last, after optimizing aperture and shutter speed for the scene’s brightness.
This disciplined approach keeps your files clean, your workflow efficient, and your attention focused on the variables that actually require active management.
How to Focus Your Lens for Lightning Photography at Night
Focusing at night presents a unique challenge since autofocus systems struggle in low-light conditions. So you’ll want to switch your lens to manual focus and set it to infinity (∞) for immediate shutter response without hunting delays.
If your scene lacks a clear distant reference point, use your camera’s Live View mode and zoom into the screen to manually focus on even a single faint light source on the horizon.
After each lightning strike, check your LCD screen closely to confirm sharpness. Make minor focus adjustments before the next exposure if anything appears soft.
Setting Manual Focus Correctly
Getting sharp focus is one of the most critical steps before you start shooting lightning at night. Autofocus techniques often fail in low-light conditions, so switching to manual focus gives you complete control.
Follow this precise sequence:
- Point your lens at a distant city light or bright star and engage autofocus to lock onto it.
- Switch your lens to manual focus mode immediately after locking focus to prevent the camera from hunting between shots.
- Zoom into your LCD screen after each strike to verify sharpness and micro-adjust if needed.
Setting focus to infinity (∞) works as a reliable backup when no light sources exist.
Once you’ve locked your manual focus position, don’t touch the focus ring—consistency is everything.
Using Live View Zoom
When no bright light sources exist in your scene, Live View zoom gives you a precise manual focusing solution without guessing.
Activate your camera’s live view mode, then digitally zoom into the screen at maximum magnification—typically 5x or 10x—targeting the faintest available light source, whether a distant streetlight, a faint star, or a horizon glow.
Manually rotate your focus ring until that light source appears sharpest on the display. Once confirmed, immediately switch your lens to manual focus mode to lock that position permanently between shots.
After each lightning strike, use your LCD screen to verify sharpness on the captured bolt.
These zoom techniques eliminate autofocus hunting entirely, giving you reliable, repeatable focus accuracy throughout your entire shooting session.
Verifying Focus After Strikes
Each lightning strike gives you a built-in verification checkpoint: immediately review the captured image on your LCD screen, zooming into the bolt itself to confirm edge sharpness. This focus confirmation process keeps you in control throughout the session.
Analyze three critical indicators during each review:
- Bolt edge definition — sharp bolts display clean, distinct edges without soft halos.
- Lightning visibility — if the bolt appears blurred or indistinct, your focus point has likely shifted.
- Background sharpness — distant structures or stars should appear crisp alongside the bolt.
If focus confirmation reveals softness, switch your lens back to autofocus, reacquire a distant light source, then immediately return to manual mode.
Don’t wait—storm conditions change quickly, and imprecise focus costs you irreplaceable captures.
How to Adjust Aperture and Shutter Speed as the Storm Closes In
As a storm closes in, you’ll need to narrow your aperture progressively to compensate for the increasing brightness of nearby lightning strikes. Start wide at f/4–f/8 for distant bolts, then make gradual aperture adjustments toward f/13 as strikes intensify and move closer.
Avoid jumping settings abruptly—incremental changes keep your exposures consistent and controllable.
For shutter speed optimization, count the interval between strikes. Active storms producing strikes every few seconds warrant 15–30 second exposures, capturing multiple bolts per frame.
As ambient conditions shift—cloud cover thickening or twilight approaching—recalibrate shutter speed accordingly. Keep ISO locked at 100–200 throughout, letting aperture carry the primary exposure burden.
Monitor your LCD after each sequence and adjust immediately based on what you see.
Set Your Camera to RAW Before the Storm Starts
Before the storm arrives, switch your camera’s file format to RAW—it’s one of the most impactful pre-shoot decisions you’ll make.
RAW format preserves every bit of sensor data, giving you full control during post-processing. JPEGs discard critical information permanently, leaving you locked into the camera’s decisions.
RAW files capture everything your sensor sees—JPEGs silently discard the details you didn’t know you’d need.
With RAW files, your camera settings become starting points rather than final commitments.
Three specific advantages make this essential:
- Exposure recovery: Pull back overexposed lightning bolts or lift crushed shadow detail without degrading image quality.
- White balance flexibility: Adjust color temperature freely after shooting without penalty.
- Noise control: Apply precise noise reduction algorithms in post rather than relying on in-camera processing.
Switching to RAW costs nothing except storage space—a worthwhile trade for maximum creative freedom.
How to Stay Safe During Lightning Photography Sessions
Choosing your shooting location requires the same analytical rigor you apply to your camera settings—position yourself near a substantial structure or inside a vehicle, never under isolated trees or on elevated terrain.
Monitor the storm’s approach by tracking the time between lightning flash and thunder; when that interval drops below 30 seconds, the strike distance has closed to roughly six miles and you need to move immediately.
Treat your tripod as a liability in close-proximity conditions, since its metal construction and elevation make it a conductivity risk that outweighs any photographic benefit.
Safe Shooting Location Selection
Staying safe during a lightning photography session comes down to 3 core principles: distance, shelter, and situational awareness.
Studying storm behavior and lightning patterns before you shoot gives you a tactical edge.
Follow these location selection rules:
- Maintain distance — Position yourself at least a mile from the active strike zone, using your car as a Faraday cage if necessary.
- Identify shelter — Scout hard-roofed structures before shooting begins; avoid trees, open fields, and elevated terrain.
- Monitor movement — Track storm direction continuously; if lightning closes within six miles, retreat immediately.
You control your risk exposure the same way you control your aperture — deliberately and proactively.
Never let a compelling composition override your exit strategy.
Recognizing Dangerous Storm Proximity
Recognizing when a storm has moved into dangerous proximity is a non-negotiable skill that separates disciplined lightning photographers from reckless ones.
Monitor storm indicators continuously: count seconds between lightning flash and thunder, then divide by five to calculate distance in miles. Under three miles demands immediate retreat.
Watch for rapid darkening skies, increasing wind shifts, and hail—these storm indicators signal accelerating danger.
Your safety precautions should include establishing a predetermined withdrawal threshold before shooting begins, not during panic.
Shelter inside a hardened structure or fully enclosed metal vehicle—never under isolated trees or open structures.
Remember, no photograph justifies your life. The freedom to shoot another storm depends entirely on your survival today.
Maintaining situational awareness lets you operate boldly while staying within calculated, rational boundaries.
Frequently Asked Questions
Can Lightning Photography Damage Your Camera Sensor Over Time?
Lightning photography won’t damage your sensor’s longevity through normal use. You’re simply capturing ambient light, so your image quality remains unaffected. Manage your exposures correctly, and you’ll protect your gear indefinitely.
How Do You Protect Your Gear From Rain During a Storm?
Like a soldier guarding equipment in a downpour, you’ll want rain covers shielding your camera and lens. Practice gear maintenance religiously—inspect seals after every storm shoot to keep your setup battle-ready.
Is Lightning Photography Legal in All Outdoor Locations?
Lightning photography isn’t universally legal—you’ll encounter restricted zones like military bases and private property. Prioritize lightning safety and photography ethics by researching local regulations, obtaining permits when required, and respecting posted boundaries before setting up your equipment.
Can Smartphone Cameras Ever Substitute for DSLRS in Lightning Photography?
Over 90% of lightning shots demand manual settings adjustments—something smartphones can’t fully deliver. Their smartphone limitations in aperture and shutter control mean you’ll miss critical exposures, so grab a DSLR for real creative freedom.
How Far Away Should You Be From Lightning When Shooting?
You’ll want to maintain a safety distance of at least 10 miles from active cells. Prioritize storm awareness by tracking movement—never let a storm overtake your position, as lightning can strike well beyond visible rain.
References
- https://digital-photography-school.com/how-to-photograph-lightning-the-ultimate-guide/
- https://stushort.com/lightning-photography-guide-2/
- https://alphauniverse.com/stories/the-secret-to-daytime-lightning-photography/
- https://www.slrphotographyguide.com/how-to-photograph-lightning-and-storms/
- https://photographylife.com/photography-lighting-setups
- https://www.nickulivieriphotography.com/blog/lightning/
- https://artwhitton.com/how-to-guide-shooting-lightning/
- https://f64academy.com/7-tips-for-photographing-lightning/