You’ll need a DSLR in manual mode with f/8-f/11 aperture, ISO 100-200, and an intervalometer for continuous shooting at 1-4 second intervals. Position yourself safely in your vehicle on the storm’s backside, using the 30-second flash-to-bang rule and wireless triggers. For daytime captures, use f/16-f/22 with 1/4-1/20 second shutters; nighttime requires f/5.6-f/8 with 10-30 second exposures. Stack your RAW sequences in post-production for dramatic results—but there’s critical timing and positioning tactics that separate amateur attempts from professional captures.
Key Takeaways
- Prioritize safety by following the 30-second flash-to-bang rule, staying in your vehicle, and positioning on the storm’s backside.
- Use manual mode with f/8-f/11 aperture, ISO 100-200, and manual focus on the horizon to prevent automation failures.
- Adjust exposure settings based on conditions: f/16-f/22 daytime, f/5.6-f/8 nighttime with 10-30 second exposures.
- Enable continuous shooting with an intervalometer set to 1-2 second intervals daytime, 2-5 seconds nighttime for maximum capture.
- Stack multiple RAW frames in post-production to create dramatic time-lapse sequences showing lightning development patterns.
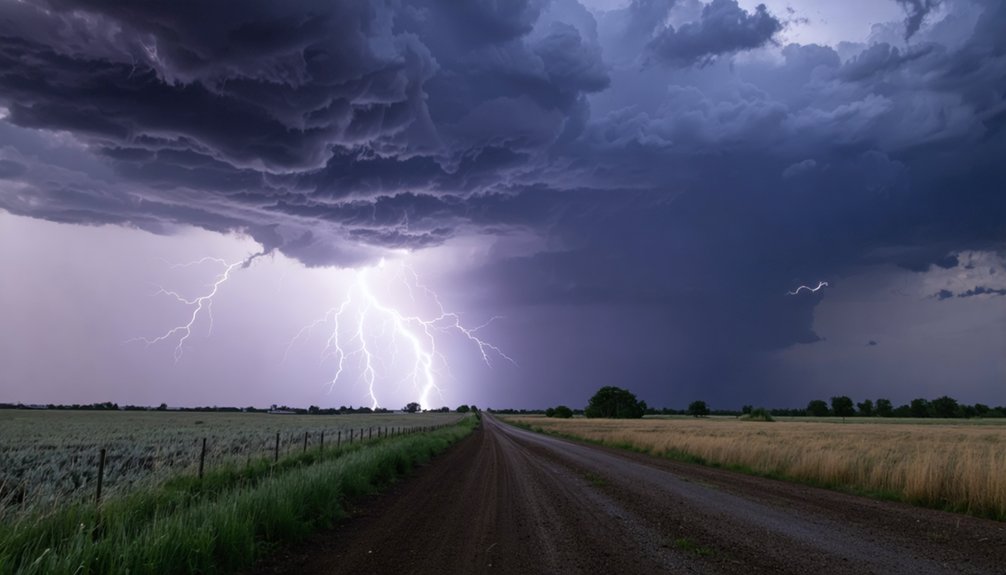
Safety Precautions and Best Practices for Storm Photography
Before you position your camera to capture dramatic lightning strikes, understand that this pursuit carries genuine life-threatening risks. Lightning kills 24,000 people worldwide annually and injures 240,000 more.
Master storm photography situational awareness by applying the 30-second flash-to-bang rule—anything less means you’re within six miles of danger. Never chase alone; you’ll need a partner for driving and radar monitoring while you watch the sky.
Implement strict storm photography safety protocols: stay in your vehicle, use wireless triggers, and position yourself on the storm’s backside. Monitor wind speeds, strike patterns, and precipitation constantly. There’s no safe outdoor position during electrical activity—if you hear thunder, you’re already in striking distance.
Plan your escape route before the first flash appears.
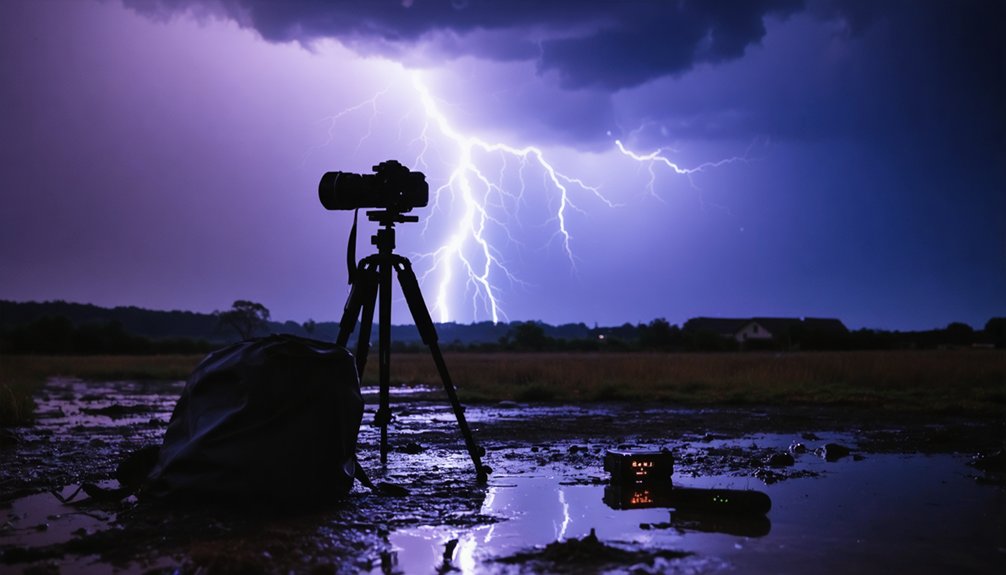
Essential Equipment and Gear Setup
While atmospheric drama unfolds miles away, your equipment selection will determine whether you capture stunning bolts or return with corrupted files and weather-damaged gear. You’ll need a DSLR or mirrorless camera with manual mode—Nikon, Canon, Sony, and Fuji all deliver.
Higher resolution sensors grant post-processing flexibility, while built-in interval shooting eliminates external triggers (though intervalometers work fine). Your tripod must withstand wind and vibration through hundreds of consecutive exposures. Stable tripod alternatives include weighted sandbags or ground-level platforms when traditional setups won’t suffice.
Configure your intervalometer for maximum sequences—typically 999 shots—at shortest possible intervals. Durable portable power sources keep systems operational throughout extended storm duration. Cable releases prevent shake. Lightning triggers detect strikes automatically, firing your shutter precisely when electrical discharge occurs.
Camera Configuration and Focus Techniques
How do you configure your camera to reliably capture electrical discharges that last mere milliseconds? Switch to manual mode immediately—automation fails during storms. Set your aperture between f/8 and f/11 to maintain sharp focus from sky to ground, adjusting to f/5.6 for distant strikes. Manually focus on the horizon, eliminating autofocus hunting that wastes critical seconds. Keep ISO at 100-200, exploiting lightning’s inherent luminosity while minimizing sensor noise. For Nikon systems, pair f/7 with 1.3-1.6 second shutter speeds.
Deploy lightning triggers like MIOPS Smart+ to eliminate guesswork—the light sensor initiates exposure instantly upon flash detection. This automation adapts to ambient lighting conditions without constant manual intervention. Set your intervalometer for maximum sequences (999 shots), ensuring dynamic camera movements don’t interrupt capture cycles during evolving storm conditions.
Exposure Settings for Day and Night Lightning Capture
Lightning photography demands radically different exposure strategies between daylight and darkness—your settings must counterbalance ambient brightness while preserving bolt detail.
During daytime, you’ll need ideal aperture adjustments from f/16 to f/22, enabling shutter speeds between 1/4 and 1/20 second. Set ISO to 100 for minimal grain. As storms intensify, open to f/5.6 or f/8 to prevent blown-out strikes. Predictive shutter timing requires at least 1/4 second to capture complete bolt duration.
Nighttime shooting liberates your settings. Switch to f/5.6 or f/8 with 10-30 second exposures, capturing multiple bolts per frame. Raise ISO to 100-400 as needed. Test exposures verify your ambient balance before the storm arrives, ensuring you’re prepared when lightning strikes without restriction.
Continuous Shooting Methods and Image Stacking Workflow
Once you’ve dialed in your exposure parameters, mount your camera on a sturdy tripod and activate continuous shooting mode to maximize your lightning capture rate. Switch to manual mode and configure your intervalometer for 1-2 second intervals during daytime storms, extending to 2-5 seconds at night. Set shutter speeds between 1-4 seconds for optimal strike visibility. You’ll need fast storage cards and RAW file storage considerations—expect 300-400 frames per 10-second sequence at 30fps playback. Guarantee continuous power supply solutions for extended storm sessions.
For dramatic results, capture your series via timelapse, then stack frames in post-production rather than relying on single long exposures. This workflow lets you composite multiple bolts into compelling barrage effects while maintaining landscape detail and eliminating gaps between strikes.
Frequently Asked Questions
What Are the Best Weather Apps for Tracking and Predicting Lightning Storms?
You’ll want My Lightning Tracker and Blitzortung Lightning Monitor for reliable lightning strike notifications and weather radar updates. They’ll give you the freedom to chase storms safely while protecting your gear through accurate, real-time tracking capabilities.
How Do You Scout and Choose Optimal Locations for Lightning Photography?
Scout locations by monitoring cloud formations with radar apps, then choose safe indoor vantage points with unobstructed sky views. Consider time of day—twilight’s ideal—and position yourself at storm edges with compelling foregrounds like distant mountains or structures.
What Legal Permits Are Needed for Shooting Lightning in Public Areas?
You’ll need permits for commercial shoots on public land, meeting location permission guidelines and public liability insurance requirements. Handheld gear typically doesn’t require permits, but tripods and time-lapse equipment may trigger permitting depending on your jurisdiction.
How Much Storage Space Is Required for a Full Lightning Time-Lapse Session?
You’ll need massive storage capacity estimates—think 128GB minimum for serious sessions. Shooting RAW at 1-second intervals devours space fast. Use data compression techniques like JPEG+RAW combo, but don’t sacrifice quality for your storm-chasing freedom.
What Backup Power Solutions Work Best for Extended Lightning Photography Shoots?
You’ll need portable generators like EcoFlow DELTA Pro (3600Wh) or backup battery packs exceeding 2kWh for overnight lightning timelapses. Choose models with pass-through charging and UPS capability under 10ms to prevent camera interruptions during storms.