Building a storm chasing photography portfolio starts long before you reach the field. You’ll need to master weather pattern analysis, learn to interpret radar tools like RadarScope, and complete NWS storm spotter training. In the field, shoot in full manual mode, keep ISO low, and use a lightning trigger for precise captures. Accept that most chases won’t deliver—that persistence sharpens both your forecasting instincts and your camera technique. There’s far more to unpack ahead.
Key Takeaways
- Start in full manual mode with f/11 aperture, adjusting shutter speed between 2–15 seconds based on available light conditions.
- Use a dedicated lightning trigger mounted on a sturdy tripod to automate shutter release and capture unpredictable lightning strikes.
- Shoot RAW and JPEG simultaneously, then review files post-chase to identify and correct technical errors consistently.
- Diversify your portfolio by capturing various storm phenomena beyond lightning, including supercell structures, inflow bands, and dramatic cloud formations.
- Accept that most chases yield disappointing results; disciplined persistence and repeated attempts are essential for portfolio growth.
What Storm Chasing Photography Actually Demands From You
Storm chasing photography isn’t just about showing up with a camera—it demands a convergence of meteorological knowledge, technical skill, and split-second decision-making. Your chase preparation begins days before, analyzing weather patterns to anticipate storm behavior and identify ideal positions.
Storm chasing photography demands meteorological knowledge, technical skill, and split-second decisions made days before you ever raise your camera.
You’ll need mastery over composition techniques while simultaneously monitoring shifting conditions. Gear maintenance guarantees your equipment performs when supercells develop without warning.
Photographic timing separates compelling images from missed opportunities—lightning waits for nobody. Safety protocols aren’t optional constraints; they’re your operational framework, preserving your freedom to chase another day.
You’ll study escape routes, read inflow bands, and make calculated repositioning decisions under pressure. Experience sharing accelerates your development greatly.
Partnering with seasoned chasers compresses years of trial-and-error into focused, actionable learning that no tutorial fully replaces.
Plan Your Storm Chase Before You Touch the Camera
Before you pack a single lens, effective storm chasing demands methodical preparation rooted in meteorological analysis.
You’ll analyze upper air and surface data days ahead, identifying atmospheric instability, humidity levels, and wind shear that signal supercell development.
Master storm tracking by integrating professional tools like RadarScope and AccuWeather for real-time weather patterns assessment.
You’re targeting specific geographic corridors where unstable air masses converge, not randomly driving toward dark skies.
Completing National Weather Service storm spotter training sharpens your ability to read atmospheric data precisely, transforming raw forecasts into actionable positioning decisions.
You’ll forecast supercell development zones, calculating safe viewing distances before committing to a location.
Your preparation window starts days before deployment.
Disciplined pre-chase analysis separates photographers who consistently capture compelling images from those who repeatedly miss ideal storm structure entirely.
Pack the Right Gear for Every Chase Day
Your gear selection directly determines your ability to capture usable images in harsh, unpredictable conditions, so start with a weather-resistant camera body paired with a rain cover and carry both wide-angle (10-18mm) and telephoto (70-300mm) lenses to handle varying storm distances and compositions.
Add ND or NiSi filters for daytime light control, a sturdy tripod for long exposures, and extra fully charged batteries, since power drain accelerates in cold, wet environments.
Finally, equip a dedicated lightning trigger—such as the MIOPS Smart+ or Pluto Trigger—to automate shutter release on light detection, eliminating the guesswork of manual timing during rapid electrical activity.
Weather-Resistant Camera Bodies
When chasing severe weather, protecting your camera gear starts with choosing a weather-resistant body built to handle rain, dust, and humidity. Camera durability directly determines how long your equipment functions under extreme weather conditions. Bodies like the Canon EOS 7D Mark II, Nikon D500, or Sony A9 II feature magnesium alloy construction with sealed joints protecting internal components from moisture infiltration.
Pair your sealed body with a quality rain cover for extended downpours. Even weather-sealed cameras have vulnerability points around ports and battery compartments. Silica gel packets stored inside your bag absorb residual moisture between shoots.
Don’t compromise on this foundation. A camera body failure mid-chase costs you irreplaceable shots and expensive repairs. Investing in proper weather protection gives you operational freedom regardless of atmospheric severity.
Essential Lenses And Filters
Capturing storm structure and lightning requires two distinct focal ranges working in tandem: wide-angle and telephoto.
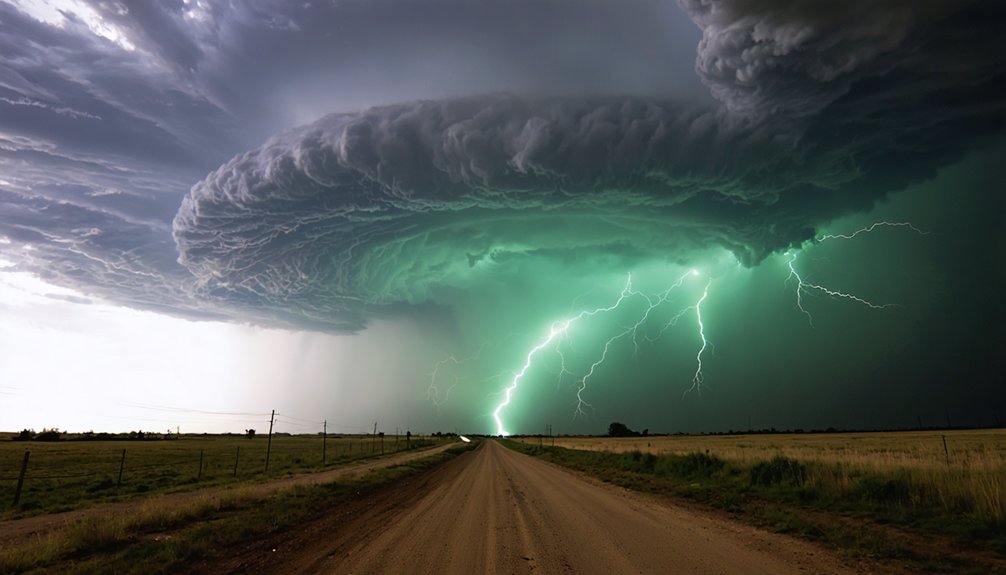
You’ll need a wide-angle lens (10-18mm) to document expansive supercell formations, inflow bands, and mammatus clouds. Switch to telephoto lens types (70-300mm) when isolating distant lightning channels or compressing storm structure details.
Filter benefits become critical during daylight chases. ND and NiSi filters control excessive ambient light, letting you maintain longer shutter speeds without overexposing frames. This control gives you freedom to capture motion blur within rotating wall clouds during bright afternoon conditions.
Keep rain covers on both lens types throughout active chase sequences. Moisture infiltrating your optics mid-chase compromises image sharpness permanently.
Pack each lens in accessible compartments, enabling rapid shifts as storm positioning demands immediate focal length changes.
Lightning Triggers And Accessories
Lightning triggers eliminate the guesswork from bolt capture, letting you fire the shutter within milliseconds of a discharge rather than relying on manual timing.
Devices like the MIOPS Smart+ and Pluto Trigger detect light fluctuations, sound, or laser interruptions, initiating exposure before your reflexes can respond. You’ll pair these with a sturdy remote shutter release to eliminate camera shake during long exposures.
Trigger timing is everything when storms intensify rapidly. Configure sensitivity settings before conditions deteriorate, since fumbling with menus during active lightning compromises both your shot and lightning safety.
Mount your trigger directly to the hot shoe or sync port, then test response thresholds against ambient light levels. Carry extra batteries for both triggers and camera bodies, ensuring your entire electronic system stays operational throughout the chase.
Set Your Camera to Capture Lightning and Storm Structure
Shoot in full manual mode so you control every variable—start with an aperture of f/11, adjust shutter speed between 2–15 seconds based on ambient light, and keep ISO as low as possible to minimize noise.
As skies darken, open your aperture gradually and extend exposure times to compensate for reduced light while maintaining sharp storm structure detail.
For lightning, pair your camera with a dedicated trigger like the MIOPS Smart+ or Pluto Trigger, which detects electrical discharges faster than any human reflex and fires the shutter automatically.
Manual Mode Camera Settings
When photographing storms, you’ll need full manual control over your camera’s three core exposure variables: ISO, aperture, and shutter speed. Mastering the exposure triangle lets you adapt instantly to volatile lighting conditions without surrendering creative decisions to automation.
Start with these proven baseline settings:
- Aperture: Begin at f/11, tightening for closer lightning strikes, widening for distant activity.
- Shutter speed: Set between 2–15 seconds, adjusting as skies darken progressively.
- ISO: Keep it low to minimize noise; shoot RAW + JPEG simultaneously for maximum flexibility.
Switch to manual focus after achieving initial lock with autofocus, then verify sharpness regularly as conditions shift. Use bulb mode with a remote shutter for extended lightning exposures.
These settings give you complete freedom over your final image.
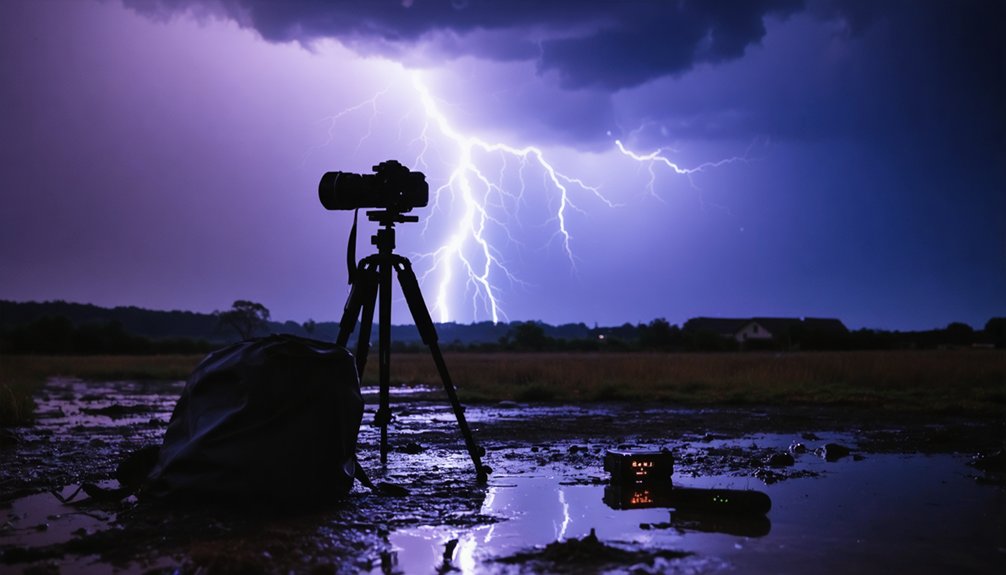
Lightning Trigger Techniques
Capturing lightning with consistent precision requires two core tools: a dedicated lightning trigger and a sturdy tripod. Devices like the MIOPS Smart+ or Pluto Trigger detect rapid light changes and fire your shutter automatically, eliminating guesswork from your lightning photography techniques.
Mount your camera firmly, set bulb mode, and connect your remote shutter trigger to minimize vibration during long exposures. Position your aperture around f/11, keep ISO low, and let the trigger handle split-second timing you physically can’t replicate.
During daylight chases, pair these tools with ND filters to control exposure without sacrificing shutter flexibility. At night, open your aperture slightly wider to compensate for darker skies.
Bracket your shots consistently, review focus frequently, and reposition quickly as storm structure evolves.
Aperture And Shutter Control
Mastering 3 interdependent variables — ISO, aperture, and shutter speed — gives you direct control over how lightning and storm structure register on your sensor.
Aperture effects determine depth and light volume; shutter speed controls motion capture and exposure duration. Shoot in full manual mode to own every decision.
- Aperture: Start at f/11; tighten for closer strikes, open wider for distant lightning
- Shutter speed: Set 2–15 seconds, extending exposure as skies darken
- ISO: Keep it low to minimize noise and preserve dynamic range
Bracket your shots aggressively and use bulb mode for unpredictable strike timing.
Switch to manual focus after initial autofocus lock, then verify sharpness regularly.
RAW format preserves maximum latitude for post-processing storm detail.
Compose Dramatic Storm Shots in the Field
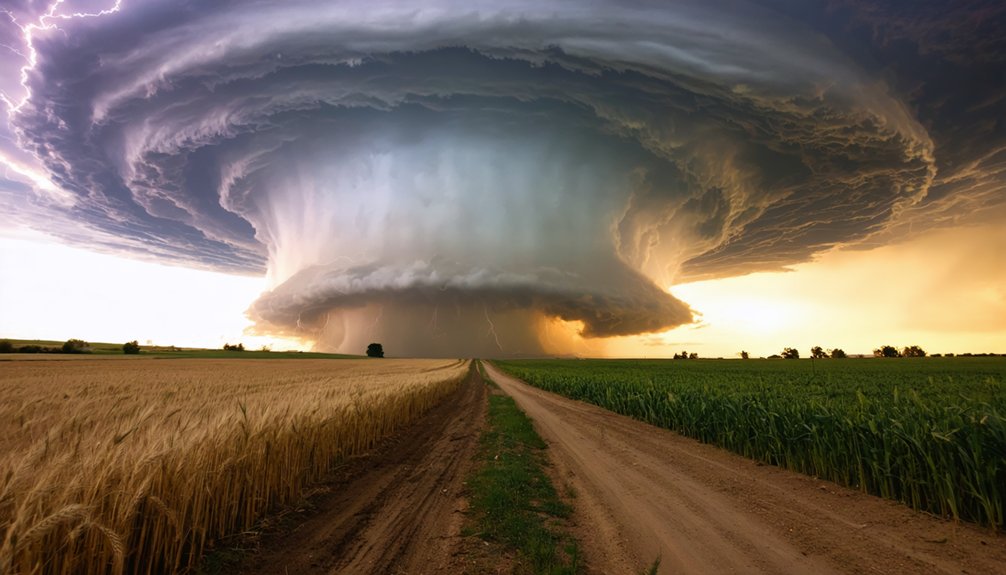
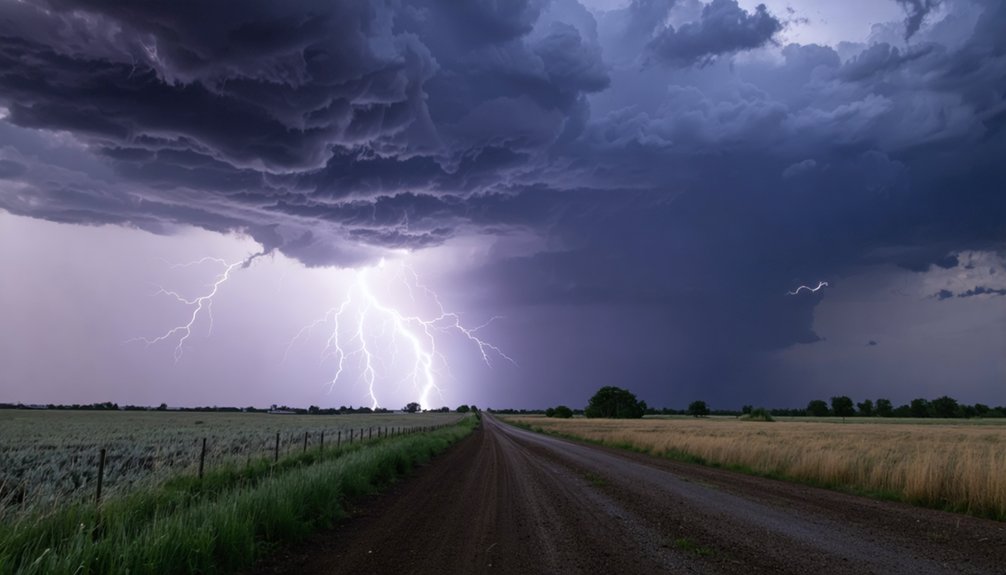
Composing dramatic storm shots requires deliberate positioning and intentional framing before the action unfolds. Scout locations offering unobstructed sightlines, then use leading lines like rural roads or fence rows to pull viewers into your storm composition.
Position yourself perpendicular to the storm’s forward movement, maximizing structural visibility while maintaining your escape route.
Apply the rule of thirds by placing the storm’s base or wall cloud at the lower third, letting the sky dominate your frame. Wide-angle lenses capture dramatic angles that emphasize scale, while foreground elements like fields or isolated structures add depth and context. Avoid power lines cluttering your frame.
As the storm tightens, reposition quickly without hesitating. You’re working against time, so pre-visualize your compositions before conditions deteriorate.
Grab your gear, move decisively, and shoot.
Grow Your Storm Photography Portfolio Through Repeated Chases
Building a compelling storm photography portfolio demands repetition, strategic analysis, and deliberate refinement across multiple chase seasons.
You’ll develop portfolio strategies only through accumulated chase experiences, learning what works technically and compositionally under real storm conditions.
Leverage each chase by:
- Reviewing RAW files critically — identify focus errors, exposure miscalculations, and compositional weaknesses immediately after each outing
- Enrolling in structured programs like Storm Chasing Masterclass to accelerate skill development between active seasons
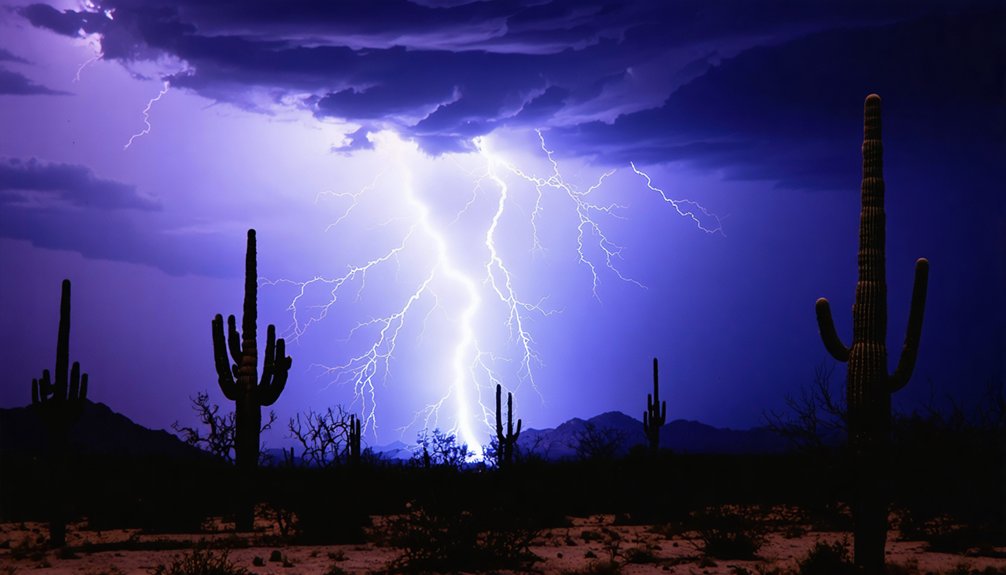
- Diversifying captured phenomena — target mammatus clouds, inflow bands, and supercell structure rather than lightning exclusively
Expect 99% of chases to yield suboptimal results. That’s normal.
Most storm chases end in disappointment. Embrace that reality — it’s the foundation every great portfolio is built on.
Your portfolio strengthens through disciplined persistence, not luck. Each failed chase sharpens your forecasting instincts, positioning decisions, and camera response time, ultimately producing images that reflect genuine meteorological understanding.
Frequently Asked Questions
You own your storm photos automatically through copyright considerations. Register them with the U.S. Copyright Office, then list on online platforms like Getty Images, Shutterstock, or SmugMug to sell or share them legally.
Can I Storm Chase and Photograph Alone as a Complete Beginner?
Don’t risk it alone—you’re not ready yet. Storm chasing demands a partner managing driving while you track radar. Prioritize safety precautions, pack essential gear, and chase with an experienced mentor before venturing solo.
What Insurance Coverage Do Storm Chasing Photographers Typically Need?
You’ll need liability coverage for third-party risks, equipment insurance protecting your gear against storm risks, and vehicle coverage for chase scenarios. Always follow strict safety protocols to potentially reduce premiums and demonstrate responsible, calculated risk management to insurers.
How Do I Handle Equipment Damage Claims After a Chase Gone Wrong?
Document all equipment damage immediately with photos, then file your insurance options claim promptly. You’ll need purchase receipts and maintenance logs. Prioritize equipment maintenance records—they’ll validate your claim and demonstrate responsible gear management to your insurer.
Are There Storm Chasing Photography Communities or Clubs I Can Join?
Like finding your tribe in the wild, you’ll discover storm chasing forums such as Stormtrack and photography meetups through local NWS spotter networks. You can connect with experienced chasers who’ll sharpen your skills and expand your freedom-driven portfolio.
References
- https://www.printique.com/blog/storm-chasing-photography/
- https://www.pixpa.com/blog/storm-photography
- https://www.youtube.com/watch?v=dytc3vWIcmg
- https://www.canon.com.au/get-inspired/storm-photography-tips-camera-settings
- https://www.mikeolbinski.com/theblog/2026/04/how-to-do-weather-photography-a-complete-beginners-guide/
- https://petapixel.com/2020/09/05/how-i-chase-and-photograph-storms-and-lightning-strikes/
- https://www.naturettl.com/how-to-photograph-storms-supercells-lightning-tornadoes/